|
|
|
Creating Lara Outfits Page 10 |
|
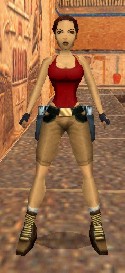
Page 1 - 2 - 3 - 4 - 5 - 6 - 7 - 8 - 9 - 10 - 11 - 12 - 13 - 14 We'll now work our colors downwards while trying to keep some sort of splotchiness to our texture. Remember the pants want to be lightest on the left and darker on the right. We could look at our 4 shades of colors as a highlight color, a blend between highlight and fabric colors, a fabric color, and a shaded fabric color. The first thing we'll do is paint the fabric color down the entire left side of our image. Use the Eyedropper to select the green color next to the darkest color. Select the Pencil tool and set the "Size" to 4 and the "Transparency" to 0%. Carefully color this shade of green downwards so that you are filling in about 2/3 of the way across the image to the right. You'll have to reposition your Editing window in order to reach the bottom. Now select the darker color and repeat the process of coloring in this darker color down the right 1/3 side of the image. Select the Brush tool and set the "Transparency" back to 70%. Set the nib "Size" to 3. Then, using rather short up and down strokes of the brush slowly work on the area between the two colors to blend them together. Do this all along where these colors meet. Don't be afraid to let the blending work its way out horizontally. You should end up with a rather splotchy area almost all of the way across. Now set the RGB values to 172, 125, and 71. This is the color of the pants in the front. Select the Pencil. Set the nib "Size" to about 3. Set the "Transparency" to 0%. Make sure the bottom of your image is showing in the Editing window. Now color a line across the bottom edge of this image. Set the "Transparency" to 80%. Set the nib "Size" to 2. Working in sort strokes in an upward motion, begin blending in the stripe at the bottom with the color above it. Work this blending perhaps 3/4 of the way up. Continue making an even but splotchy blend until the line that separated the two colors at the bottom disappears. Now a little help using an effect. Click Effects... Trilinear filters... and the select "Blur." With this done, save it as "Text171_altered.bmp." Now let's do some work on the texture in tile 172. This is the file "Text172.bmp." Go ahead and load it in. In checking our drawings we can see that the right side of this tile is back in between Lara's legs and can remain dark and shaded from the light. The left edge meets our last image and so it should be the same color as we placed there. Let's go ahead and color the entire flesh colored area of our image the same as the dark area above it. Use the Eyedropper to select this dark color. I came up with RGB colors of 96, 72, and 32. Select the Pencil tool and set the "Transparency" to 0%. Set the nib "Size" to 5 or 6 and color in all of the area that's flesh colored. Since the left edge has to match our other tile, let's set our RGB values to that color. With me that's 108, 76, and 32. Using the Pencil, set the "Transparency" to 0% and the "Size" to 4. Now color in the left side all the way to the bottom and extending about 1/3 of the way across the image. This color will now exactly match the texture that will be placed next to it. Take the Eyedropper and select the darker color on the right side. Select the Brush and set the "Transparency" back to 70% and the nib "Size" to 3. Doing as you did earlier, blend in our two shades of green where they meet. Now, just as we did with the other image, select the Pencil. Set the RGB values to 172, 125, and 71. Set the "Transparency" to 0% and the nib "Size" to 3. Make sure the bottom of your image is showing in the Editing window. Color a stripe across the bottom of this image. Set the "Transparency" to 80%. Set the nib "Size" to 2. Working in sort strokes in an upward motion, begin blending in the stripe at the bottom with the color above it. Work the blending up quite a ways. Continue making an even but splotchy blend until the line that separated the two colors at the bottom disappears. Click Effects... Bilinear filters... and select "Blur." Go ahead and save this image as "Text172_altered.bmp." The texture we looked at in tile 250 contained a highlight that's on the outside of Lara's left side. We'll erase that highlight also. When you highlight this entire side later, your own highlights will match each other better. Open "Text250.bmp." Remember this texture will be clipped from its upper left corner down to its lower right corner and nothing in the lower half will show. Using the Eyedropper, select the green color that's the texture color (116, 92,44). Select the Pencil tool and set the "Transparency" to 0%. Set the nib "Size" to 2. Color in the upper left corner. Save this texture as "Text250_altered.bmp." Periodically Viewing The Fruit of Your Work When you're designing your outfits you will undoubtably want to stop periodically and see how your artwork is looking. I'll walk you through the steps required to do that now. All of our changes to Lara's new outfit are contained in all of the small bmp images that we've been saving in the "Laras Closet\Workspace" folder. The first thing we need to do is to bring these modified texture images back into the large "Starter.bmp" image. We'll use StrPix3 to do this. After we bring it in, we'll save it out as a new bitmap so that we won't have to add all of the small images every time we want to check our progress. Close your image editing program and boot StrPix3. Click File... Open... and maneuver to your "Laras Closet\Starter" folder. Load the "Starter.WAD" file. Now to load in the small modified textures. Click in the Textures text box and scroll down to "Texture#168" and select it. Now click on the "Import" button and maneuver to your "Laras Closet\Workspace" folder. Double-click the "Text168_altered.bmp" file to load it in. Scroll down a little in the Textures text box and select "Texture#169." Again click the "Import" button and load in the file "Text169_altered.bmp." Continue this procedure for each of the files listed below.
When you have them all loaded, click on Textures... Export to Bitmap. Maneuver to your "Laras Closet\Workspace" folder and save the new large bitmap as "New_Lara.bmp." This bitmap can now be loaded in next time to save having to load in these textures again.
|